
Relearning MSX #11: The KID (AKID) text editor (part 2)
Posted by Javi Lavandeira in MSX, Retro, Technology | January 13, 2015In the previous post we saw the four menus assigned to the function keys F1 through F4 in the KID/AKID text editors. I left the F5 key for this post because it has a different function: copy and paste blocks of text. I’m going to explain now how to do that, and also some of the keyboard shortcuts available in the editor.
As in the previous post, everything I write about AKID also applies to KID and vice versa, unless I say otherwise. Again, I’ll be using a copy of the CURSESC.C file from the MSX-C Library disk in the examples.
F5: Copying, duplicating and deleting blocks of text
This menu supports three commands:
- C: Copy a block of text to the clipboard (discards the previous clipboard contents)
- A: Adds a block of text to whatever is in the clipboard
- X: Deletes a block of text from the screen and copies it to the clipboard
Unlike the other menus, nothing will appear in the top of the screen when you press F5. Instead, the editor will change to select mode. If there’s text in the line where the cursor is, then the whole line will be highlighed (it will reverse color). At this point you can select more lines of text by moving the cursor, but be aware that you can’t select any text above the current position of the cursor.
After you’ve selected the text you’re interested in you can press C, A or X to apply any of the three commands. ESC cancels the operation and brings you back to edit mode.
By default the keyboard shortcut for pasting the clipboard is . For some reason this key combination doesn’t work properly in my openMSX setup (a Mac with a Japanese keybard), so I’ve changed the shortcut to CTRL-D. I”ll explain later how to change the default shortcuts.
Here’s a video showing this in action:
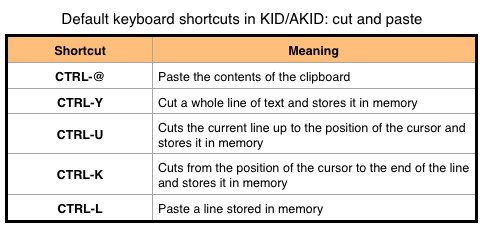
There’s a faster way to cut and paste that works with single lines of text. The default shortcuts are these:
- CTRL-Y: Cut a whole line of text and stores it in memory (this is different from the main clipboard)
- CTRL-U: Cuts the current line up to the position of the cursor and stores it
- CTRL-K: Cuts from the position of the cursor to the end of the line and stores it
- CTRL-L: Paste the line stored in memory
Again, these are just the default shortcuts and can be changed.
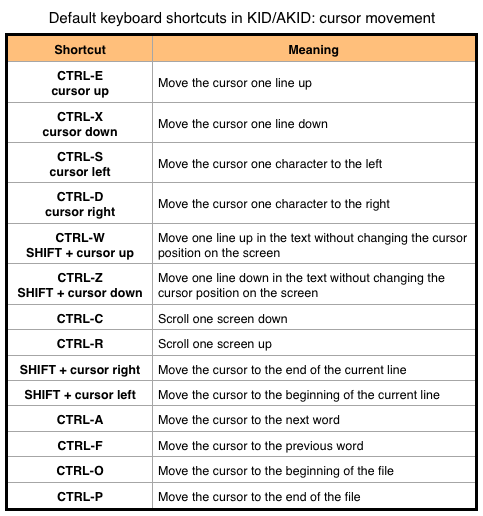
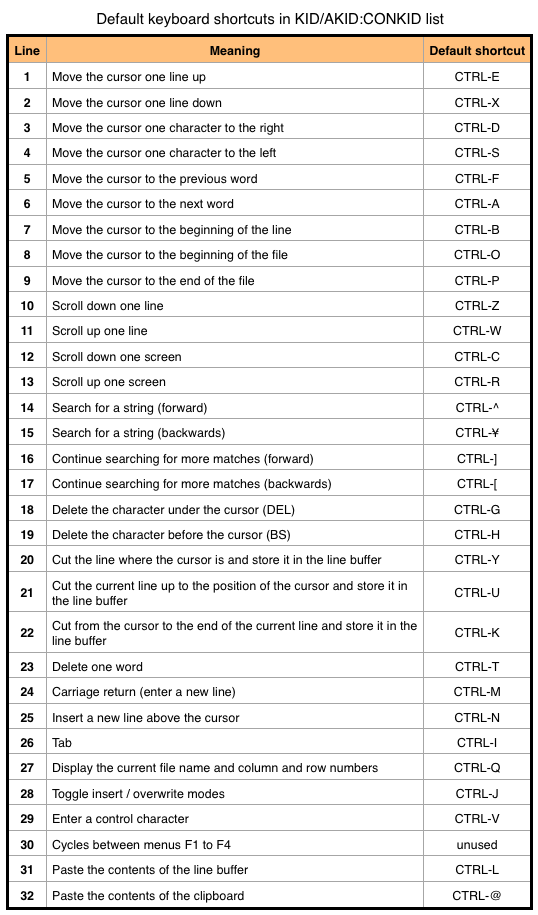
Default keyboard shortcuts
These are other commonly used keyboard shortcuts. All of these can be changed:
Changing the default keyboard shortcuts
You may remember that when we copied the text editors from the MSX-DOS2 TOOLS disk there was a third file in the KIDS directory named CONKID.COM. This is the program we use to change the default shortcuts in KID and AKID. This program is in Japanese. If the MSX computer is not in one of the kanji modes (more about this later) then it will just print garbage on the screen. You can still follow my instructions anyway because each setting is in its own numbered line, and those numbers display correctly anyway.
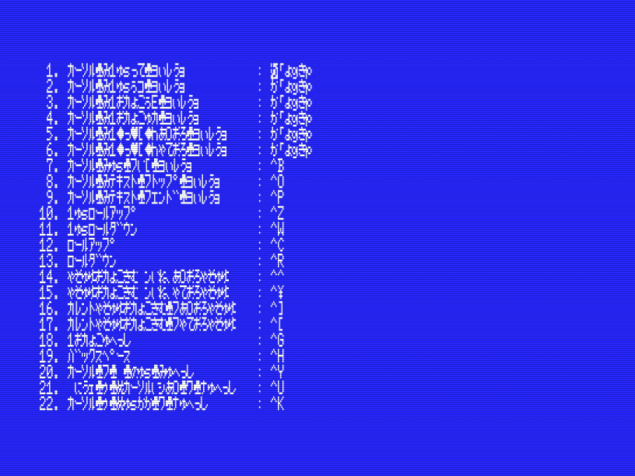
CONKID displaying garbled characters
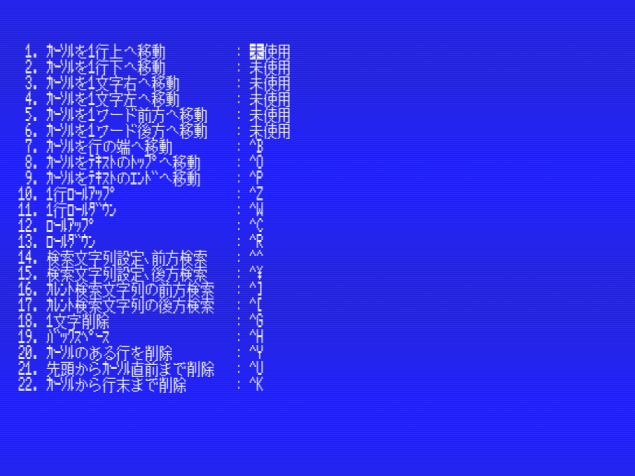
CONKID displaying correct Japanese text in KANJI 3 mode
If you can’t see correct Japanese text (and care about it), then run the following sequence of commands:
BASIC
This will take you to the MSX-BASIC interpreter. From here, run these commands (I won’t explain them in detail now):
CALL KANJI
CALL SYSTEM
The first command installs the kanji driver and turns on kanji mode. The second one returns you to MSX-DOS2. Once on the MSX-DOS2 prompt run this command to change to kanji 3 mode:
KMODE 3
We could have ran CALL KANJI 3 from MSX-BASIC as well, but I prefer this way. This video illustrates the process:
After you’ve changed to kanji mode (or not, if you don’t care about the garbled text) change to the A:\UTILS directory and run CONKID.COM from there with the file name of the text editor whose shortcuts you want to set up (either AKID.COM or KID.COM):
A:¥
CD ¥UTILS
CONKID AKID.COM
The screen will fill with the list of shortcuts that can be configured. The controls supported here are as follows:
- Cursor keys (up and down): move up and down the list
- Backspace: delete (disable) a keyboard shortcut
- CTRL+<key>: changes the current shortcut to CTRL-<key>, if the same combination isn’t already assigned
- ESC: shows the menu
Here’s the list of available shortcuts with their default values (there are a lot!):
There are also three unnumbered settings at the end of the list:

The last three settings in CONKID
Number of lines to scroll (for shorcuts 12 and 13)
By default this value is 0, which means to scroll one screen at a time. If you prefer to scroll 5 lines at a time (for example), then set this value to 5.
Start the editor in insert mode or overwrite mode
By default the editor always start in insert mode after launch. Press SPACE to change this value to overwrite mode.
Case sensitivity in searches and search and replace
By default all searches are case insensitive. Change this value to make them case sensitive.
Saving the changes
Press ESC to open CONKID’s menu:

CONKID’s menu
The menu has the following options, all of them very easy to understand:
- End (E): Save the changes and quit CONKID
- Quit (Q): Quit CONKID without saving the changes (careful, it will not ask for confirmation)
- Save (S): Save the changes and continue editing
- Default (D): Restore all the shortcuts to the default values
- ESC: Close the menu
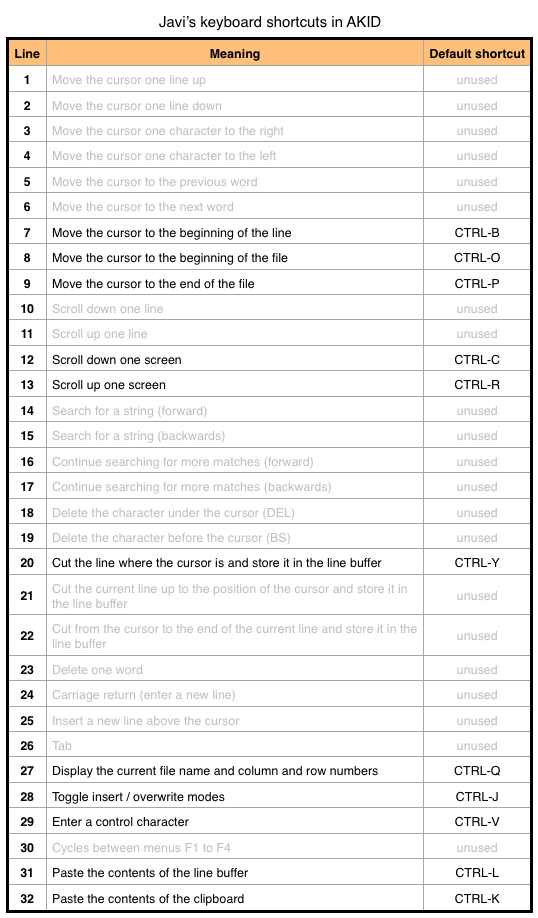
Too many default shortcuts
AKID has lots of shortcuts, and I like things simple. These are the ones I’m using:
In the next post…
Now we know how to use the text editor and we’re ready to start writing programs.
In the next post we’ll complete the series about installing and configuring MSX-C by creating scripts to automate compilation. We’ll also create an AUTOEXEC.BAT file to set up a more user-friendly environment on MSX-DOS2.
This series of articles is supported by your donations. If you’re willing and able to donate, please visit the link below to register a small pledge. Every little amount helps.
Javi Lavandeira’s Patreon page